A few months ago I received a call from Sue, one of my regular customers, and she said that she had a new project for me. She purchased this dining table at an antique store over 20 years ago and the top was starting to show its age.
She explained that she only wanted the top painted, nothing else. She had a set of matching chairs that didn't need to be repainted, and she also loved the shabby chic character on the legs, so they didn't need to be repainted either.
Now, if any of you paint furniture, you probably flatlined after you read that lol! How am I going to color match a tabletop to legs that were painted over 20 years ago?! This had my mind spinning, but I knew it was something I could do and didn't want to disappoint a returning customer by turning down the job, so I agreed to do it for her. Oh my gosh, what did I just agree to?!
When Sue and her husband brought the table over to my house, we discussed how they wanted it to look, considering it is going to be a newly painted top and heavily distressed legs.
They wanted the finish on the top to match the distressed finish on the legs. You can see why they would want the top repainted, it had some visible damage where it looked like something hot had been placed on it, 
and one side had a large crack, all of which is fixable!
To start the color-match process, the first thing to do is clean the entire table. This ensures I'm working with a clean surface, and that the color I'm seeing is true. I repaired the crack in the top next, then set out to find a color that matches.
At first I couldn't tell if the finish was from the factory, or if it was repainted. I know the store where she bought the table from sold Annie Sloan Chalk Paint, so I thought a quick test would be to match some of these chalk paint whites against the table.
I removed the legs from the table, bought a few samples of paint, and tested them on the table apron where the legs usually sit. This inconspicuous spot allowed me some flexibility in knowing that it would be covered up once the legs were reattached. When applying the samples, I made sure to work in an area that had ample natural lighting, this helps to ensure the colors I'm comparing are as true as possible. After all this work, it turned out that none of these whites matched - Dang it! 
Now I am on my own to mix a color and figure it out myself.
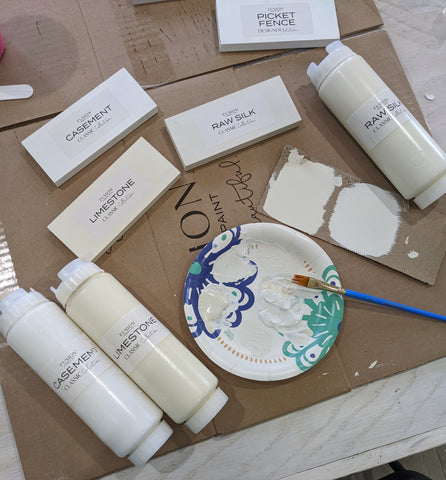
I grabbed five Fusion colors: Picket Fence, Casement, Raw Silk, Limestone, and Buttermilk Cream, then got busy mixing. 
My thought was to grab 3 colors that are similar to the original color and include Limestone and Buttermilk Cream because the table had some yellow undertones. I am not an artist and was never taught color theory, but I knew that if I at least tried, I would figure it out and at a minimum, come very close.
I mixed different ratios of the whites together in a large plastic container, and then painted them out on a white piece of paper to see if I was getting close to matching the color. 
Every adjustment to the ratio would be applied to that inconspicuous spot on the apron, 
and each one was closer to matching that the last. To be completely honest, it took me a couple days to get the right ratio of colors, but after a lot of trial and error, I had a match! In my large mixing container, I had about 3 cups of paint to spray on the table. I was hoping it would be enough, because replicating that mixture again would be next to impossible!
The next step of the process was to sand the table top with fine sandpaper, this creates some 'tooth' for the paint to stick to. Since my customer wanted to maintain the distressed look, I used wax to act as a resister, something the paint wouldn’t stick to in places where I wanted the raw wood to be exposed.
After the wax was applied, I sprayed 3 coats of my custom paint mixture on the table.
Before Coat 1
Coat 1
Coat 3
If you remember from earlier, I only had about 3 cups of this mixture, and whew, it was just enough to paint 3 coats on the tabletop, and provide a small sample to Sue for touch-ups.😱
After the paint dried, areas where wax was applied started to crackle. I used a hair dryer to warm up the wax underneath, this makes it was easier to distress with sandpaper. 
When the distressing was complete, I applied 3 coats of semi gloss polyurethane to the tabletop, 
and reattached the legs. BOOM! It's done and ready for a photoshoot and customer pickup!


This is where I repaired the large crack, barely noticeable now.
When my customers came to pick it up they were SHOCKED at the transformation and so happy! After they got it back home, they sent me some pictures of it together with their chairs, looking better than it did when they bought it 20 years ago. They were elated by the perfect color match to the legs and chairs, and because they knew my work, they were confident I'd be able to pull it off.
Doesn't it just sparkle in their dining room?!

If you have a piece you would like painted but don't want to do the work yourself just click my picture below for more info on custom painting.


0 comments